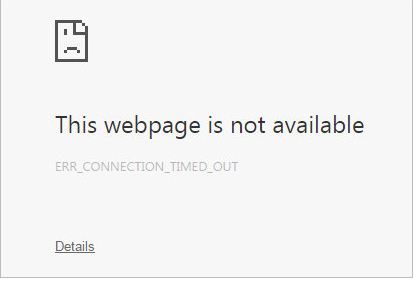
Every user knows that errors are the main problems that affect our computers. One of these errors is “Err Connection Timed Out” Error. This error can affect your PC in one way or the other. It can hinder your Computer from working well.
To see an error is not a good thing, but there is always a way to fix this. It is not complicated if you follow the instructions well. When you do this, your computer will be protected from the various risk that results from the error.
Reasons Of Err_Connection_Timed_Out Error
This error may occur due to various reasons. In fact, the error has led to many problems. If you listen to many users, you will get me right. Normally, it happens when one is browsing. These are the reasons for the error.
- Using an outdated browser.
- Incorrect configuration of your IP and DNS server settings.
- By using an outdated, corrupted or broken Network Update Driver. You can also miss the driver completely.
- Poor internet connection
- Failing to clear your browser’s cache.
6 Easy Methods To Fix Err Connection Timed Out Error
1. Adjust LAN Settings
This can be a reliable solution for you. You only need to try and discover whether it will work out well for you. LAN settings are very important as they keep your PC up to date. To avoid conflicts when doing the settings you are required to follow these steps:
- Just go to Search, then type Internet options, and open your PC internet options. This is located in a control panel in your computer.
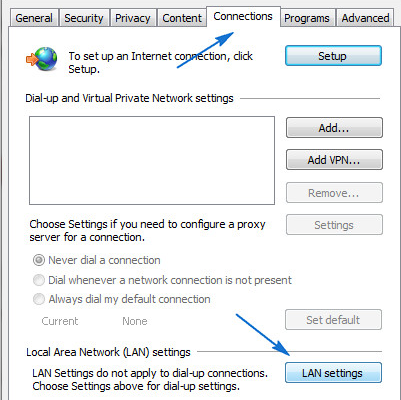
- Move to the connections tab, here you will see LAN Settings, choose it.
- Make sure you uncheck detect settings automatically and then for your LAN Use Proxy Server.
- You are required to restart your computer.
Keep on trying this to access your preferred site again, after you change LAN Settings and the error still remains you are supposed to try the next solution.
2. Changing Default Time-Out PC Settings
Usually, the browser has what we call time-out limit when responding to the site’s server. Browsers normally show connection time-out automatically. This acts as a warning when the server does not respond. If you wait more than 20 minutes, know that this is an error on your favorite site.
Don’t worry! There is a method to solve this problem by changing the default in Windows 10. In fact, this is not complicated. Let us try to fix.
- In your PC find the Search Option, then type regedit where you open Registry Editor.
- After that, you are supposed to navigate a specific path.
- In your subkey, just add a DWORD, then call it The Receive Timeout.
- Finally, restart your computer.
This site does not take more than twenty minutes to load. Meaning that if it exceeds that time, your problem might not be solved. However, you have learned how time-out limit settings work because it will help you in the future. There is always a chance to try other solutions if this fails.
3. Edit Your Windows 10 Computer Hosts File
Users may have blocked hosts file. If you are one of them try this solution. You may have blocked a certain site in your computer that makes you not to access the site. Nevertheless, there is a chance to check all your “blacklisted” website where you unblock them. You can follow these steps:
- Just go to a location called C: WindowsSystem32driversetc.
- Then find the host file and right-click, then with notepad open it.
- Check at the bottom of this file if there are any sites listed there.
- Just in case there is any site listed, delete them.
- After that, save this hosts file.
4. Renewing IP and DNS
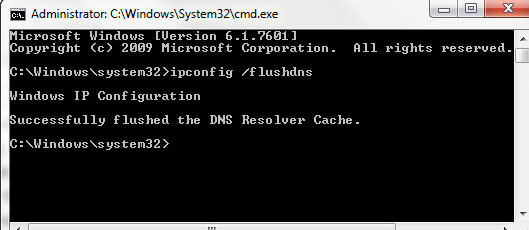
This is another thing you are supposed to try. Renewing the IP and DNS Address is another thing we can do to fix an error. The reason is that DNS has a tendency of causing “connection time-out” problems or error. So, we are going to reset and clear the cache. To reset the IP address and DNP cache, follow these steps:
1. On the start menu right-click and choose the Command Prompt
2. After that, add the commands and then press Enter. This is after you have entered the following:
- ipconfig /registerdns
- ipconfig /flushdns
- ipconfig /renew
- ipconfig /release
3. Now you can restart your PC after this process.
5. Disabling Problematic Extensions
Almost every user will use various extensions. Sometimes, these extensions may interfere with the browser and cause a message ‘Connection Timed Out’ to appear. For you to fix such a problem, you need to disable all your problematic extension using these steps;
- Visit your browser and click your PC Menu icon which is on your right side (top corner). Then choose more tools followed by extensions.
- On your Windows 10, the list of extensions will automatically appear. By unchecking your Enabled Checkbox that is next to extension name, disable all the extensions.
- After you disable all extensions, restart the browser and find out whether this problem has disappeared. If not, you will have to enable all the extensions one at a time until the one which is causing the error is found.
6. More Expert Solutions
=>> Expert Solution 1: Clear Your Browser History and Cache
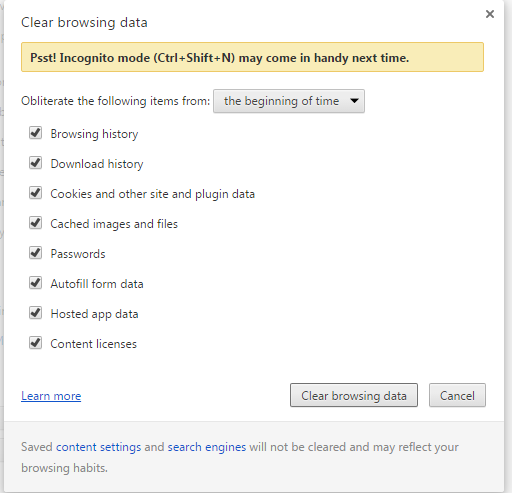
Clear History and Cache From Google Chrome Browser: Go to ‘Customize and control’ (top right corner in the Chrome browser) -> Then click ‘Settings’ -> Now you click the ‘Show Advanced Settings’ button in the bellow -> then you go ‘privacy’ section -> Now you click on ‘Clear Browsing Data’ button -> check all the box in the new popup -> then you click on the ‘Clear browsing data’ button.
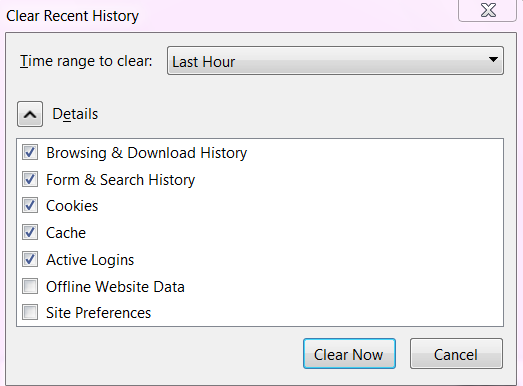
Clear History and Cache From Mozilla Firefox Browser: Go to ‘Customize’ in the Firefox browser -> then click on ‘History’ button -> now click ‘Clear recent history’ button ->then ‘Details’ -> Check Cookies and Cache from the box -> then click the ‘Clear now’ button.
=>> Expert Solution 2: Modify Your Windows Hosts File
Sometime we use Windows hosts file to block access to some of the harmful website or IP addresses. Sometime firewall and hosts file also block other websites or IP addresses, That’s why you need to check your Windows hosts file and see if is any website URLs or IP there and delete them.
You check your hosts file from c:windowssystem32driversetc. But you can not change or delete any data in hosts file from there. To edit the hosts file then you follow the instruction bellow-
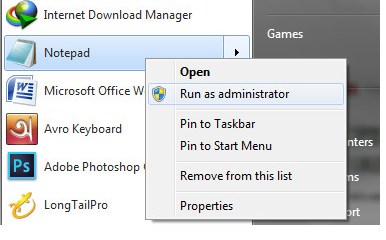
First you right click on the Notepad and click the ‘Run as Administrator’ button.
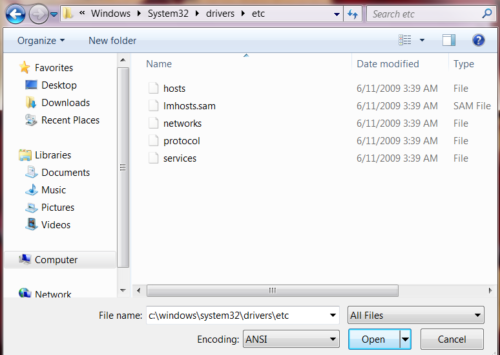
After opening notepad than click on ‘File’ from the menu bar -> then click ‘Open’ and then give the root link in the ‘File name’ search box like bellow in the picture and obviously enable ‘all the files’ from the drop down in that folder. The root link is given bellow.
c:windowssystem32driversetc
Now you click ‘hosts’ file and then click open button in the notepad and delete all the website address and IP address after the last # sign like the image in the bellow.
Then click on the ‘File’ from notepad menu bar and then click Save and close notepad. Now refresh your browser and load the website that were giving the error in the past.
=>> Expert Solution 3: Flush or Renew DNS and IP Address
Sometime this error create for DNS and IP blocked issues. That’s why we will flush the DNS and also release or renew the IP address which may resolve the error. First you go to the Start menu and then type ‘CMD’ in the search box and hit the enter button from your keyboard. When you hit enter then the command prompt window will pop up in your monitor
In that window you copy each of the following lines in the bellow one by one and paste in command prompt window and hit the enter button after each line.
ipconfig /renew
ipconfig /registerdns
ipconfig /flushdns
ipconfig /release
Once you done then restart your PC to take effects and check if the internet error is gone.
=>> Expert Solution 4: Filter Your Firewall and Website
You check your windows firewall and internet security settings to make sure your internet browser is not blocked from browsing the internet. If you installed any any website filtering software in your computer then you uninstall them.
=>> Expert Solution 5: Change Your LAN Settings
Sometimes LAN settings blocked website IP address. So you check and adjust the LAN settings. First you go to ‘Start’ menu -> then go to ‘Control Panel’ -> Now click on the ‘Internet Options’.
After clicked then internet properties window will show then you select the ‘connections’ tab and click on the ‘LAN Settings’ from window.
When you clicked then open a new windows and you deselect the box says, ‘Automatically Detect Settings’ and also deselect that says ‘Use a Proxy Server for Your LAN’. Then you click the OK button and restart your PC.
=>> Expert Solution 6: Talk to your ISP
Sometimes your Internet Service Provider (ISP) put your IP address in a safe zone which was causing some website not loading and show this unwanted browser error. So, talk to your Internet Service Provider to make sure you are not in any sort of website filtering zone.
Tips to Avoid The Internet Connection Error Next Time
- Ensure your drivers are not missing, corrupt or broken.
- Keep on checking your Website Filtering and Firewall as well as the internet security settings to ensure your browser is accessing the internet.
- Since your browser keeps on saving browsing data that includes app data, cookies and cache files keep on clearing them to avoid this error.
- Hosts File should be edited to avoid the blocking of some of your websites.
- Update all your network adapter drivers and making sure they are updated.
The Final Words (Summary)
Receiving an error to your PC or Android browser is always a disappointment to many users. Either an internet error, browser error or a DNS error is never a good or exciting thing. This Err_Connection_Timed_Out error can cause many problems to your PC. This has become a technical issue that should be solved.
With our solutions above it is easy to fix them. As the user, you only need to try each solution and discover which one works for you. Am sure that all solutions cannot fail you and if they do consult a professional.


