
Building a competent dog house that is smart and safe for your dog doesn’t have to be an uphill task. You just need to put some basic principles in mind, thus simplifying the whole process. However, it is essential to consider things like the floor type, your dog’s habits, and, most importantly, its size. Here are steps to adequately guide you on how to make a perfect dog house.
Step by Step Instructions for Making Your Dog House
Step 1: Planning
Planning is the initial stage in making a dog house. You will be needed to draw a plan either by yourself, engaging an expert, or getting a planning guide on the internet. Whichever way you use, you must carefully keep the plan and have the size of the house in mind. Traditionally, dog’s homes are made up of small base platforms with sides that extend upwards in a vertical direction. If you live in a place that rains frequently, you must plan a slanting roof to drain the rainwater. For dogs, smaller houses tend to give them a sense of security.
Step 2: Assemble the materials
Many materials can be used to make a dog house, but wood is the best. That’s because it is an excellent insulator. Wood makes the dog’s house warm during the winter and adjusts during the summer seasons. The size of the dog will dictate the size of the materials to be used. Also, while choosing the materials, please ensure they are dog friendly. Anything that comes in contact with your dog must be safe. Here is the list of tools and materials you will need:

- Materials for base (4-foot square wood panel
- Wood Frames and side materials (21/2 by 4-foot planks of wood)
- Power drill and screwdriver
- Plywood sheets
- Hammer and nails
- Tar paper
- Sandpaper
- Saw
Step 3: Select the ground
Flat ground is the most suitable spot to make a dog’s house. However, if the field is not leveled, you might be forced to carry out landscaping to get the desired level for the house. When landscaping, you must ensure the ground is the same size as the base of the house. If the area is often muddy, you can put some heavy logs below to ensure the house is lifted and free from dampness.
Step 4: Build the platform
In the third step, you are required to cut out the material in the right dimensions and build the base. Take the legs and join each to the end of the panels using nails. After this, make a square frame of the whole house, but make sure it is smooth. Align the frame with the bottom panels and trim out any protruding edges.

Step 5: Assembling the house
Once done with aligning the base and the frame and screwing them together tightly, the next move is on to the sides. Take the side pieces and nail them together and ensure they are stable. Then take the two bottom panels and nail them together. At this point, you must make sure that the construction displays structural integrity. It is also essential to make sure that the outer panel can be removed.
Step 6: Create the doorway
Using a saw, cut out the door from the last panel to give the dog a doorway for accessing the house. The size of the door can be big or small, depending on your preference. Then, nail the panel’s and screw it on the front part of the house Also, consider your dog’s size to ensure you don’t make a very big or small door.
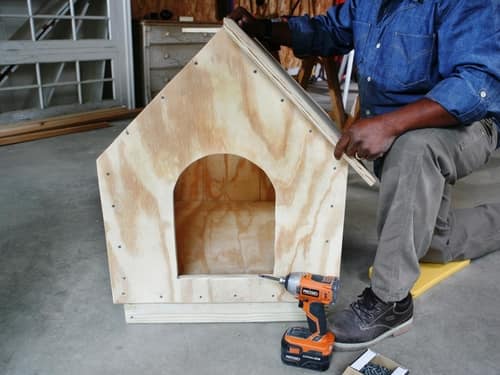
Step 7: Roofing
Before roofing, it is of the essence to note that some dogs like staying at the rooftop. With that in mind, take the roof panels and join them together with the frame piece. In the case of dogs that like climbing up the roof to spend some time there, you can nail shingles on the panels. However, ensure the shingles are removable because, during the summertime, they tend to get hot. Finally spread the tar paper on the roofs top to prevent possible damage.
Step 8: Painting and interior
Your dog needs some touch of comfort and style, but on the contrary, most people don’t know this. After construction, choose the right color to paint the house. Natural colors are fairer for dog’s houses. Paint both the inside and outside. When painting, ensure the colors blend well with those that are in your own home. Use something that will be appealing to you and neighbors too. Also, you can write the name of your dog in the house just for fun. Finally, spread some sawdust on the floor to make it a little bit warmer.
The Final Words (Summary)
Building a dog’s house is fun, and it is also satisfying to know that your dog is safe and comfortable. Whether you are keeping your dog for fun or other reasons, it is vital to ensure they are appropriately housed and protected.
Leave a Reply